|
|
|
|
 |
 |
| by Andreas Cocq |
In
this tutorial, Andreas Cocq guides us through the use of
the Level Exporter from Greenbriar Studios. He shows us
some of the do's and don'ts that need to be kept in mind
when creating geometry that will end up as a level in a
game, as there are some rules that apply for levels that
don't affect other types of game model! |
| |
|
Ok, so now you have the Level Exporter plug-in
installed and are ready to go - but where do you
start? Does gameSpace look different to you in
comparison to the game editors that you are used to?
And what is all this about BSP, legal blocks and
Booleans?
This mini-tutorial is
intended as an introduction to the Greenbriar Level
Exporter. It covers basic steps for creating level
geometry in gameSpace and exporting it into Conitec's
3D GameStudio (3DGS) game engine. Since it serves as
an introduction to the subject matter, it will cover
the entire process in broad strokes, and describing
things in detail will be beyond the scope of this
tutorial. However, this should give you a great
grounding in using the Level Exporter!
It is assumed that the
reader has a reasonable understanding of the way
gameSpace and 3D GameStudio work, and that they are
familiar with the naming and terms used in both.
Therefore terms such as WED, .MAP etc. will not be
explained.
Because of the differences
between the .MAP format and Conitec's adaptation (the
.WMP format) certain information (for example, the
grouping of blocks as in WED) can not be provided
during level export. This should be kept in mind when
looking at the result in the WED!
Now we are almost ready to
start... right after this disclaimer: The process that
is described here is one way of reaching
the goal. It is not the only way and it may not be the
"best“ way (if there is such a thing!). Also this
tutorial is not about how to become a better level
designer - it's focus is on the technical details of
using the Greenbriar Level Exporter.
With all that in mind, it
is time to begin!
|
|
The
man with the plan ... (some general comments) |
|
Many of you will know the phrase "the only place
where success comes before work is in the
dictionary.“ Well, the same applies to gameSpace
and the Level Editor.
First, make sure that
you have an idea what you want to design in
gameSpace before you start. Maybe you have a floor
plan of a building you would like to see in your 3D
engine, or perhaps you have plan you sketched out on
paper?
Is that essential? No.
Will it help you move
along quicker? YES!
While we are on the
subject of planning ahead, do take some time to
think about what kind of textures you will need for
your level. We will not cover much in terms of
textures in this tutorial, but for your work on your
own level, it is something worth considering before
you start the work.
For this tutorial, I
happen to have a hand-drawn floor plan from an
adventure idea I had a couple of years back already
scanned into my PC, so that will be my starting
point. For textures, I will only be using the
textures that Conitec delivers in the STANDARD.WAD
file.
|
|
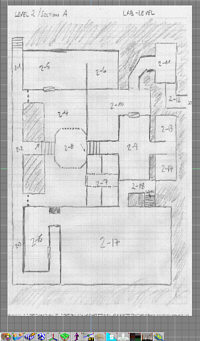
A simple floor plan (click for larger image)
|
In gameSpace, create a
Plane primitive – size is secondary at this point,
as we will adjust that after we apply the texture.
Then using the material editor, select the Texture
Map color shader (the one with the Caligari logo).
Select the proper texture file (for example, Level
Exporter_Tut_Level.jpg) and assign the material to
the plane.
Switch to a TOP view and
resize the plane so the proportions look right
(alternatively, if you are working with a specific
scale, adjust the size precisely via the object info
box). Once it looks OK for you, put it in a separate
layer and lock that layer, which will make life
easier! You won't be able to accidentally select or
change this plane which is just there to hold the
background image we are working from.
The perspective view can
distort your image, so modeling is best done mostly
in the TOP and SIDE views.
When working with a
background image like this I prefer to set the Draw
Object As option to solid, to make sure it's always
nicely visible, even if I switch to a wireframe mode
for modeling – cool option, thanks Caligari! |
|
Illegal geometry... sounds gruesome! But what does
it mean?
Many of the current 3D
engines use BSP (Binary Space Partitioning) tree
culling for calculating visibility. You will find
a lot of information available on the internet
that goes into the mathematical details of what
this involves and means. For our purposes, what is
important to keep in mind is that BSP only allows
convex blocks, which limits the modeling to
objects with planar faces.
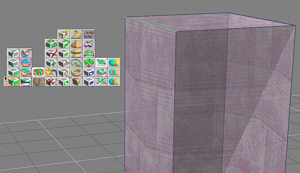
A picture speaks a
thousand words, so here is an example:
|
|
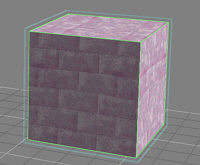
Legal Geometry -
a normal cube object, where all faces are planar
- a technical term for "flat" |
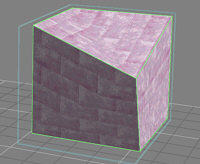
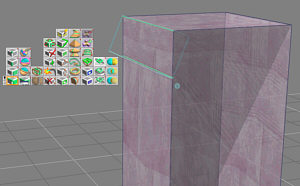
Illegal geometry
- one vertex on the top face has been moved
down, resulting in a non-coplanar (non-flat,
twisted) face. |
|
The problem can be illustrated in the real world
with this example: imagine a thin, rectangular metal
sheet laying on a table. There is no way to lift a
single corner of this rectangle from off the table
without lifting at least one additional corner off
the table as well. If you want to move only one
corner you will have to either bend the metal plate
(which is what we are not allowed to do in a BSP
engine) or cut the rectangle into two triangles
(imagine this as a "hinge" diagonally across the
metal sheet, so you are not bending the metal sheet
- also note at this point that the direction of the
diagonal "hinge" affects which point you can lift up
from the table!)
So when working in
gameSpace, make sure that all the blocks are BSP
legal. The easiest way of achieving this is to avoid
moving single vertices – always work with edges or
faces.
gameSpace offers a large
set of functionality for multiplying and altering
edges and faces. In addition, there are some great
tools for deforming geometry that can save you a lot
of time compared to working in WED – we will be
using some of them in just a little while.
gameSpace also offers
two functions that can help you with your level
design and avoid gaps in your level. First, there is
the setting for what type of collision is used
during modeling (for example, Collision With Floor,
Collision With All ...) - by using this option,
gameSpace can let you now when your blocks are lined
up. Also, different "snap to“ modes are available
(for example Snap Vertex To Face) which can help you
with the alignment of your blocks.
|
|
Since gameSpace offers wonderful tools such as Boolean
Subtract, it is very tempting to use them to create
doorways, windows, and so on. The simple truth is...
DON'T!
|
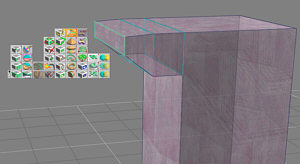
|
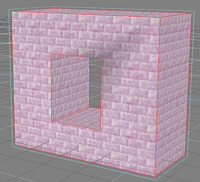
This shape does not conform to the BSP standard,
because it has a hole in it |
In his
book "[digital] Character Animation 2 / Volume 1“
George Maestri said "Booleans are evil“ - this
is essentially true! Whenever Boolean operations are
performed, the software has to go through a process of
approximation, which can lead to unwanted geometry
being added. While gameSpace does a good job with
Booleans, the resulting object is very likely to be
not BSP-legal . For example, if you Boolean Subtract a
cube from another to create a "window“ (as seen in the
image on the left), you get an object that's fine in
gameSpace but leaves the Level Exporter baffled as to
where the "breakpoints“ for dissecting the geometry
are supposed to be. |
|
That is not cause for
alarm though. You can still easily achieve the same
effect without using Booleans, and it is wise to start
thinking in this way when modeling for levels (it is
also useful when modeling for export to other 3D
packages, not just game-related ones, as many other
packages are not flexible enough to robustly handle
geometry like this, even through gameSpace has no
problem with it).
The solution is to use
tools such as Copy, Move, Resize, Snap, etc to achieve
the same result (see image on right, where a window
has been created that will export easily and
correctly). |
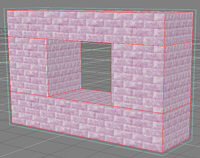
This does conform to BSP
standard, as it is made from four separate
blocks |
|
Having loaded up our floor plan, we are ready at last
to do something constructive!
|

First wall segment |
With the units of measure
set to meters, start by creating a simple cube and
scale it so it is 0.5 meters thick, 2 meters wide and
2 meters high. Give it a meaningful name (for example,
"WallSegmentMaster“) - this is our block that we will
use as the original and will copy later. If you
already have some textures imported from a WAD file,
go ahead and assign the texture you want. If you don't
have any textures imported, look
here,
or just go with the default grey (drab as it may be!).
As you will see, I am
using some textures from the STANDARD.WAD file that is
delivered with 3D GameStudio. |
|
Next, copy the cube, rename it (e.g."Wall01“) and
place it on top of the floor plan. You can switch to
the wireframe display to make positioning the wall
easier (you did remember to set the Draw Object As..“
to Solid for the floor plan, right?).
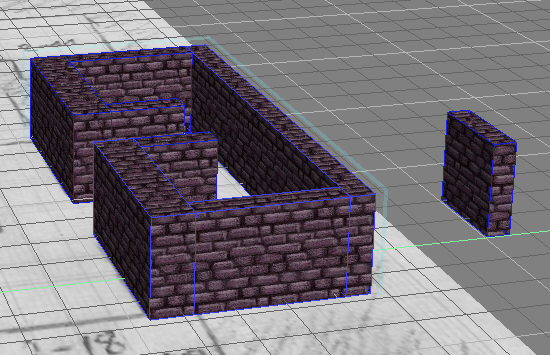
Now adjust the length of
the wall segment to the desired length and create,
place and scale additional wall segments, building on
our sketch, as seen below :
|
|
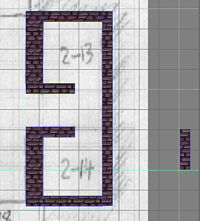
Simple Room, top view |
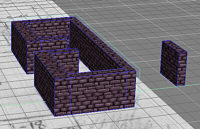
Simple Room,
perspective view (click for larger image) |
|
And there you have it, we have a simple room! It
still lacks a ceiling and a floor, but those are
easily created from cubes that are added above and
below the walls.
One tip here : I found
it easiest to assign the game UV scale (via
Greenbriar Studio's GameUV tool) while I am doing
the modeling, rather than wait until at the end,
because that ensures the cubes display with a
good-looking texture in Solid mode (otherwise, the
textures may appear stretched or distorted - this
is not a problem, other than that it does not look
so nice when working with it!)
|
|
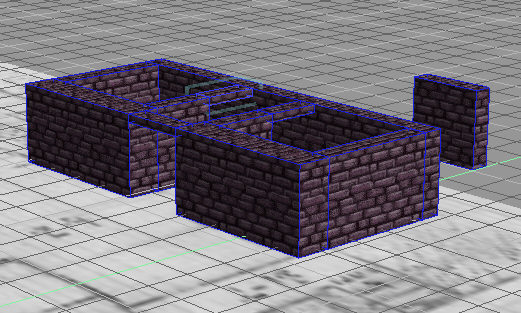
Although we do have
a way in and out of the room, it is not really
what people would call a doorway, right? The
simplest solution is to add another cube over
the place where a door would be placed in WED.
Since we know our wall height is 2 meters, we
can make this section 0.2 meters in height, 0.5
meters thick and vary the length according to
the available space. Luckily, we can use a copy
of our WallSegmentMaster and scale it to our
needs. |
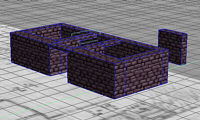
Simple room, now
with "doorways" (click for larger image) |
|
Before we get into more intricate things,
another word of advice. Use gameSpace's Object
& Scene Libraries to save copies of your wall
segments and scene WIPs, just in case your PC
decides that the middle of your editing
session is a good place to roll over and play
dead! These will also be great for re-use
later in the project, or even in other
projects, allowing you to build up your own
personal collection of pre-made objects to
drop into your levels!
|
|
A more complex
wall segment |
Great, we have walls!
But they are not very exciting, are they? Let's fix
that now by adding some extra detail to bring things
to life.
We can create some trim
on the wall segments and avoid steretypical 90
degree (perpendicular) corners to break up visual
monotony!
First, we create our new
"WallSegmentMaster“ by adding some cubes to the top
and bottom sections of the wall. Here it is vital
that the cubes have exactly the same width and are
aligned properly (snapped to edge), because if they
are not then the chances are that gaps will appear
during later manipulations (sweeping, bending etc)
and that would spoil the effect. Precision is of the
utmost importance, and gameSpace allows you to
achieve that!
When you are satisfied
with what you have created, then save a copy of the
object in your object library for later use in other
scenes. This is a great way to build up your own
libraries! You will soon have a set of unique but
instantly reusable content to meet your needs! |
|
Why Not Add
Edges, and Sweep? |
|
If you are an experienced gameSpace or trueSpace user
(or even if you have just read the manual, and know
the tools well enough to see this alternative way of
working!), you may frown at the operations above and
ask "Why not just add edges & sweep?“
Well, I'm glad you asked!
Not everything that can be
created in gameSpace can be exported by the Level
Exporter. As a modeling tool, gameSpace allows the
addition of edges to a single cube, and then
manipulation of the newly created face. While this
looks fine in gameSpace, the Level Exporter cannot
"dissect“ the object because it can only add start or
end faces (or caps) to an object (in technical terms,
a multi-segmented block can only be divided along the
edges and then one or two faces added in order to make
the resulting shape BSP legal).
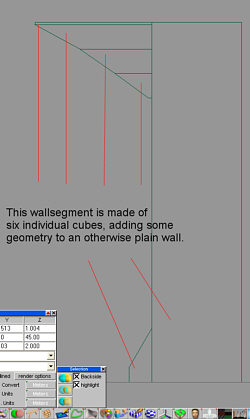
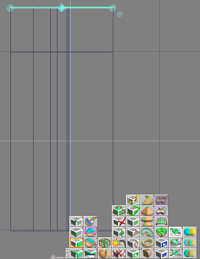
For example, let us show
how you MIGHT think about modeling the above edge to
the wall without the apparently "clumsy" method of
using 6 different cubes to do it. In the first image,
a single edge was selected on our regular cube (our
wall), and the Slice Object By Selected Line/Plane
tool was chosen :
With a move of
the mouse, an additional face was created and
selected, as seen in the second image below :
After using
the Sweep tool on the face a few times, while altering
the size of the final face, we can get the result in
the third image :
Looks so much quicker than
modeling 6 new cubes yourself to make the interesting
shape for the wall, right? However, the Level Exporter
cannot deal with the result of this manipulation, as
it there is no way for it to know how to divide the
object up, so when exported to WED it creates 8 blocks
instead of the expected 3 blocks, with a large portion
of the object being broken into several thin blocks.
In fact, the end result is a large hollow block! The
two smaller cubes would be exported correctly (the
Level Exporter would add one "cap" to close off the
outside cube, and two "caps" on either side of the
inside cube)
So what's the solution?
Create this object by using three separate cubes, just
as we did in the previous section. Sure, you can model
using the Edge and Sweep tools as seen here, and the
Level Exporter may even be able to export BSP-legal
geometry, but even in that best case scenario, most
likely it will be a lot less efficient than if you
planned and created the model with the BSP format in
mind.
In general, keeping your
objects as simple as possible pays off when the time
comes to export it to WED.
|
|
Next, it is
time to add some nice curves – something everyone
sorely misses in WED. It can be done there,
certainly, but it does take some time!
|
|
Next, it
is time to add some nice curves – something
everyone sorely misses in WED. It can be done
there, certainly, but it does take some time!
There are
several methods available in gameSpace and we will
look at a couple of them. Here is the "swept away
and RSVP (Rotate, s'il vous plait)“ method, as I
call it!
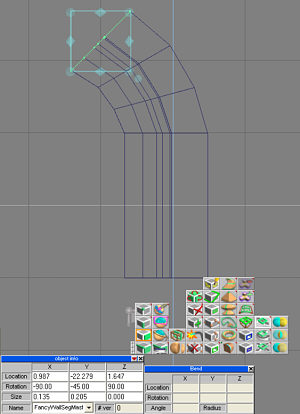
Make a
working copy of our fancy wall segment from above,
and select all the faces on one side. Use the
Sweep tool once and exit the sweep mode by
selecting the Point Edit: Faces icon – this is
important because otherwise the rotate in the next
step will not work properly!
|
 |
|
Rotate
the (still selected) faces - depending on how you
configured gameSpace, you would use the rotation
diamonds, the manipulation widget, or the object info
box (to input the rotation degrees manually). Move the
faces to position them where they need to be. Repeat
this a few times, until you have the curve segment
(e.g. corner of a room) that you want.
Depending on
how fancy you want to get, you can introduce some nice
curvature into an otherwise rather flat world:
This is already pretty good. But wait,
how about method number two?
|
|
The second method is the "Let's twist
(bend) and shout“ approach – well, shouting is
optional, although once you see the result you may
want to verbalize your appreciation for the tool!
We start, as always, with a working
copy of our wall segment and sweep the faces on one
side, creating about 15 segments (depending on the
scale of your wall segment, you may want to adjust
the sweep length and number of segments to suit your
needs). |

Options panel for the sweep tool |
|
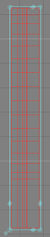
Segmented wall, ready for bending |
Press Sweep
again and you will see that 15 segments have been
added to a total additional length of 7 units
(alternatively, once could have swept 15 times to
create the segments individually, but there's no
real benefit unless the segments need to have
different lengths). |
|
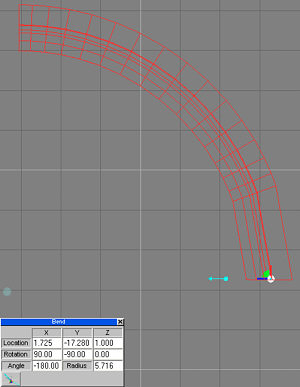
Now, use
the Bend tool to add a curve to the wall segment.
Again, use the manipulator directly or the numeric
input option for more precise control. Adjust the
rotation parameter in the Bend options panel to
align the tool properly, otherwise you will be
bending the wall in the wrong direction! Since I
want to use the base wall segment as a "stub“ to
connect to other walls, I want to limit the
bending occurring there and thus move the bend
manipulator to the edge of the wall before
bending. |
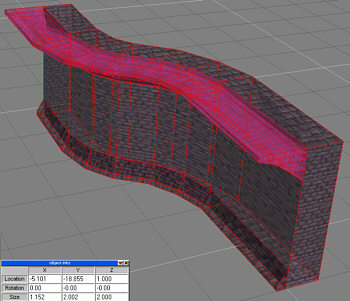
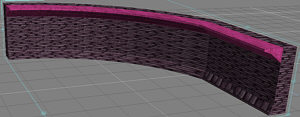
Curved wall using
the Bend function in gameSpace |
|

Curved wall
segment in perspective view |
Now I
move the faces of my base segment so the base
segment is straight again and I've created a
nice 90 degree curve. Save a copy in your object
library. As
you can see, it is easy to create curved
objects, and when used properly, the gameSpace
tools speed up the creation of interesting and
varied level elements. You just have to think
ahead and remember about BSP-legal blocks while
using the tools, as they are powerful enough to
let you make something that cannot be correctly
or efficiently exported - but used with care,
they are a great time saver! |
|
Textures - Did
Someone Say Textures? |
|
So you already have some textures in a WAD file that
you are eager to use? There is a tool for importing
WAD textures into gameSpace!
Use the Import WAD Files
plug-in to extract the textures out of the WAD
format so that they can be used in gameSpace. When
called up, the plug-in dialog requests that the user
selects a WAD file and proceeds with the Open
button. The plug-in extracts individual textures and
creates corresponding (lossless) TIFF-files and puts
them into the default gameSpace texture directory –
because of the TIFF-format, they require a lot of
disk space, so keep that in mind!
After that, use the
material editor and select Texture Map as the color
channel. Pick out your favorite texture, assign it
to the object and presto, it is done....well,
almost! Like many other 3D packages, gameSpace
allows different methods for projecting textures
onto objects (e.g. cube, cylinder, spherical,
planar). Depending on your object, some look good,
but others do not. Most game engines basically use a
planar projection based on a world coordinate
system. In addition, the scaling of the texture is
rarely ever transferable one to one, which means
that what you see in gameSpace will not perfectly
match what you will see in WED.
Luckily, the friendly
folks at Greenbriar Studios have created a
brand-new, handy little plug-in to assign the game
engine projection and scaling to gameSpace objects
on a face by face basis. Generally, this means that
what you see is what you get!
When you are ready to
assign the "right“ UV projection and scale to an
object, call up the Game UV plug-in. With it you can
assign scaling and UV projection to all of your
objects at once or individually, as you see fit.
Here is a screenshot of
our curved wall with a standard Cubic UV projection
applied. You can see the places where the texture is
discontinuous or looks "odd" or "not right".
Curved wall with "odd" texture
mapping
|
|
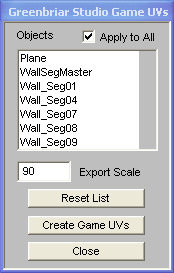
GameUV dialogue box |
Now we use
the Game UV tool to fix that. Call up the plug-in
and select Apply To All, to make sure that all of
our blocks are included. One word of warning - if
you have already assigned a UV mapping with a
different scale to some of your objects, that will
be overwritten! Adjust the scaling value until it
meets your expectations.
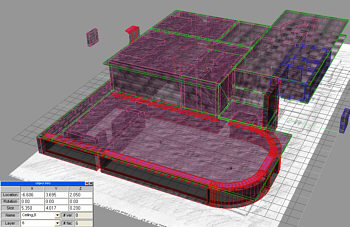
Using the
above techniques, from modeling to UV mapping and
texturing, here is a more complete level built on
top of the floor plan sketch. This one is almost
ready for exporting into 3D GameStudio! You can
see a larger version by clicking on the image
below. Note how I always kept in mind the end
result and how it would need to be BSP-legal. |
|
I have
already added some more walls, moved some rooms
to a higher elevation and added ceilings for
some rooms. Also, I have put more lights into
the scene, which brings me neatly to the next
section! |
 |
|
Since the default lights in gameSpace are most likely
not what you need in your game engine, it is time to
place some lights in the scene.
It is quite possible to
place the lights in gameSpace in such a manner that
you will be able to use them "as is“ once exported to
3D GameStudio's WED. You can adjust the position,
color and intensity to make your setup look the way
you want it to, and all this will be transferred to
WED.
That said, be sure you
remove any infinite lights, as they will add no value
in WED (they will most likely show up as point lights
that are "stuck in the ground“).
|
 |
The level is now
constructed, textures have been assigned and
adjusted, and the lights are placed. This is a
good time to save a copy of your scene into your
scene library.
Call up the Greenbriar
Level Exporter plug-in and enter the needed fields
(the documentation that accompanies the plug-in
covers all the fields in detail). Since the export
is fast, do not worry about having to export more
than once. As a matter of fact, there is nothing
wrong with exporting a partially finished level,
to have a look at it inside your 3D engine and
maybe get some pointers as to what needs tweaking
back in gameSpace.
|
|
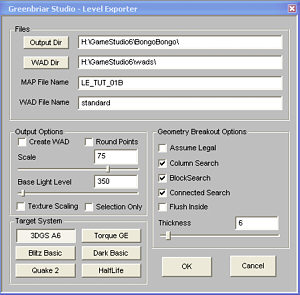
The following fields are the most interesting to us
right now:
Files
These options specify some of the filenames that the
Level Exporter needs in order to export your level.
The Level Exporter remembers the values next time
around.
Output Dir - in
which directory on your disk will this file be saved
WAD Dir – where are
the WADs to be located (in case you want to create
one)
MAP File Name –
what will the name of the MAP file be
WAD File Name –
specifies the name of the WAD file that will be
referenced in the MAP file
Output Options
Here we select the output options for out level
export.
Create WAD – the
Level Exporter can create a WAD (using the name
specified above) in which it will export all needed
textures for the level. If that is what you need, just
check the box. Warning : the Level Exporter will
overwrite an existing WAD file without verification,
so if you have "STANDARD“ as your WAD file name,
chances are that you do NOT want this option enabled
as you could overwrite WADs that came with your games!
Round Points – with
this option enabled, the Level Exporter rounds the
coordinates for vertices to integers since some
engines (e.g. 3D GameStudio) can only deal with
integers. Using this option can help avoid gaps. Since
the rounding takes place after scaling, depending on
the complexity of some of the geometry and the scale
of the level, using this option can create some
problems with the resulting blocks. Try first
exporting without this option, and if you experience
problems, try with this option checked.
Scale – is in
essence a multiplier that influences how large your
scene / level will be when it arrives in your target
system. For our level, a scale of 75 is a good value.
Set it to 300 and the rooms have the height of gothic
cathedrals. According to the manual, this also
influences the lights.
Base Light Level –
a "standard“ or default light in gameSpace will be
transferred to WED with this range
Texture Scaling –
used to turn on / off the scaling of exported
textures. Check the Level Exporter documentation for
more information about it's use.
Selection Only –
when checked, the Level Exporter will export only the
currently selected object(s) into the specified MAP
file.
Geometry Breakout
Options
These Options tell the Level Exporter how to break
apart or dissect your level geometry. They can be used
to optimize the number of exported blocks for your
level.
Assume Legal –
forces the Level Exporter to export objects with less
than 33 faces as a single block, without breaking them
apart. Unless you are creating some special geometry
that requires it, just leave it unchecked.
Column Search –
tells Level Exporter to treat objects that are named
beginning with "Cyl“ as columns and treat them
accordingly during export. If you have columns, use it
to keep Level Exporter from creating "hollow tubes“
rather than solid blocks. This is a good one to
experiment with, if you ever need to create a large
hollow pipe (such as a tunnel).
Block Search – when
checked, the Level Exporter will break the geometry
into six-sided cubes. Leave this switch enabled.
Connected Search –
as the manual says : "Used to look for sets of
connected faces under the 32 face limit." In effect,
it is an Assume Legal that is activated AFTER the
breakout is done, which allows you to force breakout
of any objects with less than 32 faces that can be
broken out, before the engine assumes that what is
left is legal.
Flush Inside –
tells the Level Exporter that you want the (broken
apart) objects to be built up so that the interior
faces are butting up against each other for a smoother
look. This can be useful when your are creating
complex objects within which some of the game action
will take place. If left unchecked, Level Exporter
will use the exterior faces to create smooth surfaces
(see example below).
Thickness – in game
system units, the depth (thickness) of each block
during creation of "hollow objects.“
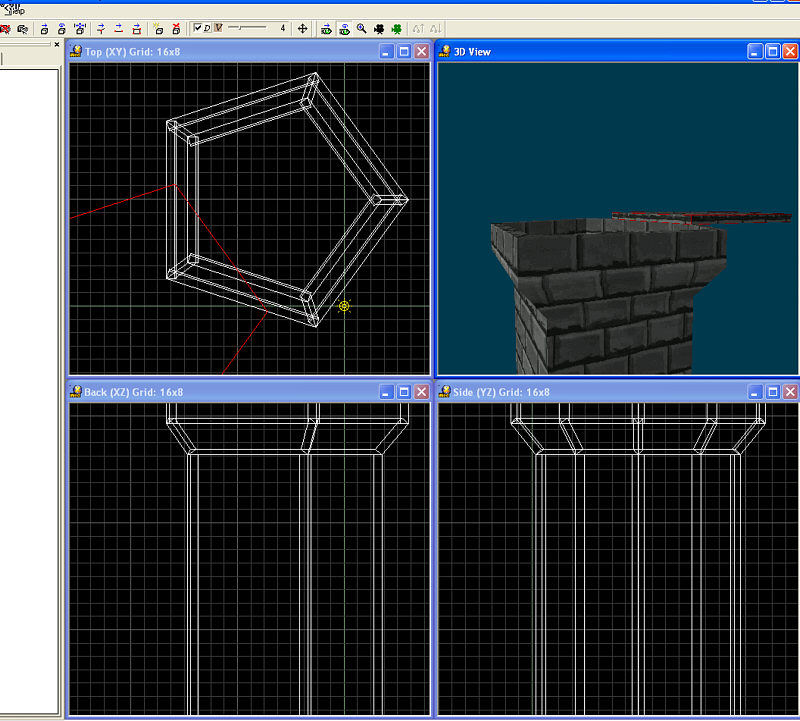
To illustrate this, here
is a sample, 5 sided cylinder (including a couple
sweeps / bevels) in gameSpace :
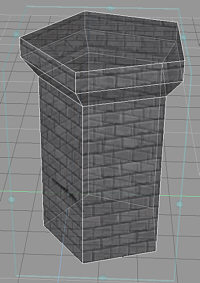
5-sided beveled cylinder
Setting thickness to 12
and NOT checking column search & connected search, I
get these results in WED (the top block that is
created has been moved out of the way in WED to show
the inside - it was exported as a 'cap' flush to the
top of column) :
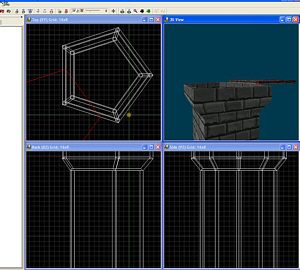
Exported object with
Flush Outside option (click for larger image)
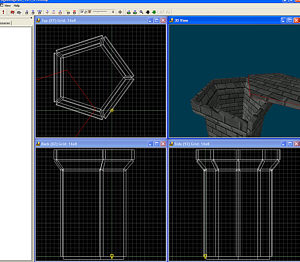
Exported object with Flush Inside option (click for
larger image)
If you try this and do not
get a hollow cylinder, check the "Column Search“ &
"Connected Search“ options and make sure it is not
enabled.
|
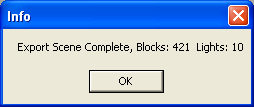
| This
identifies the game engine for which this export is
meant. Since I am using 3D GameStudio, the choice is
simple. Now, press OK and Level Exporter starts
going to work, and very quickly, you get an
informational dialog box such as the one on the
bottom. Now,
press OK and Level Exporter starts going to work,
and very quickly, you get an informational dialog
box such as this:
Congratulations! You have exported a MAP file (in
this case with 421 blocks and 10 lights). |
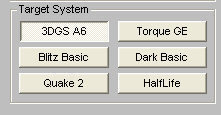
Supported target
systems
 |
|
Open up WED and call up the Open File dialog box, make
sure you select Level Files as the file type, and then
select the MAP file you just exported. Depending on
where you stored it, you may have to navigate your
hard disk a bit.
Ideally, the level should
load just fine. If you get an error message, then this
means that WED found a block that is not BSP-legal.
Load the level anyway and try to identify which
block(s) are missing, and see if you can figure out
why they are illegal by looking at them again in
gameSpace.

Exported MAP file (skybox
added)
One thing you will notice
is that all the blocks are listed one underneath the
next one, and that there is no grouping of blocks.
This is due to the fact that the standard MAP format
does not support grouping of blocks. For any project
that has more than just for fun and experimentation,
you will have to do the groupings manually in WED.
Next, I added a skybox to
surround my level. Also, I selected the upper and
lower parts of my fancy wall segments and set the
Detail flag under Properties in WED. And last but not
least, I had to assign a sensible texture to the floor
object, since the floor plan texture used for modeling
in gameSpace certainly is not part of the Standard.WAD
file!
Be sure to set the ambient
lighting first (a value of 32,32,32 is a good starting
point) before going on to building the level,
otherwise too much of it will be pitch black (if you
have lights defined).
I have added a position
object as well as an existing model file into the
level, created a script file and added an appropriate
action to the model, so that I can actually walk
through the level and see what it looks like "in
game". If you just add the position, you'll be able to
do a "fly through“, which can be fun too!
Now, it's time to press
the BUILD button, start the compilation process and
get a cup of tea (or whatever other beverage tickles
your fancy). After a few minutes (anywhere between 7 –
30, depending on how much of the level you built and
how fast your PC is) you'll hear that reassuring
"ding“ to let you know that the Map Compiler has
finished.
And the level is ready to
RUN!

In-game shot 1
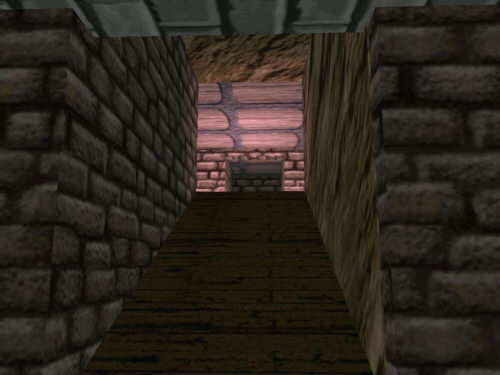
In-game shot 2
|
|
This short tutorial has shown some of the things that
can be done with Caligari's gameSpace and the
Greenbriar Level Exporter. They are both good tools
and they can assist you in your game creation.
However, having exported a level from gameSpace to
your game engine is only one step in your creative
process, as no piece of software can do everything for
you. At the end of the day, there will always be some
places where work is required!
The level shown here was
created in gameSpace in less than two hours. I tried
doing the same things in WED and found that after two
hours I was nowhere near finished. This is – from my
perspective – a true gain in productivity. The effort
required to manually group and maybe rename blocks is
not considered, because most of that would have to be
done even if all modeling was done in WED, so this
step is the same whether the level is built in
gameSpace, or in WED.
I hope you enjoyed the
tutorial and wish you lots of fun and success in your
creative endeavors! |
|
|
|
|
 |