| by James B. Gatzmer |
| Introduction |
| So, you've got your character
modeled, textured and animated according to the specifications
required by Quake III Arena. Now you want to get it
into the game and start playing!!
Follow along step by step as we show you how to export
your creation to the md3 format and create the other
necessary files for gameplay.
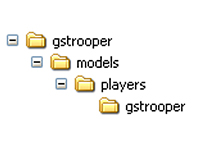
To get started, we need to create a directory structure
that is friendly with Quake III Arena. Create the
directories so that they look like the image on the
right.
|
|
|
| Loading the Scene |
| 
|
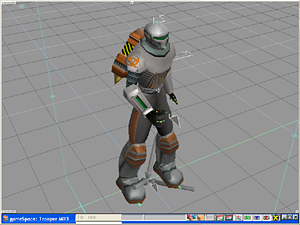
Now that you have a directory structure that is
game ready, let's launch gameSpace. Load the "Trooper
MD3" file from the "Scene Library"
of gameSpace.
Your scene should look like the image on the left.
If it does not, make sure you didn't load the "MD3-Trooper"
from the "Object Library" instead. That
file will not work for our purposes.
You may want to hide your lights from view so they
don't get in the way. Do this by right clicking
the "Draw objects as..." icon and opening
your "Display Options." Click and hold
the icon of the light and select "Hide Lights"
|
|
| Preparing the tag_floor |
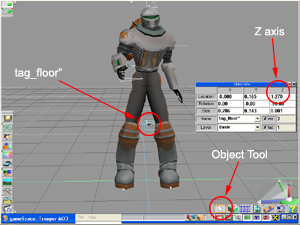
| The tag_floor" needs to be
placed properly in order for the character to align
to the ground plane of Quake III properly. In this
case, the tag_floor" is not animated so we simply
want to place it properly and leave it be.
I've already done the hard work and calculated, through
trial and error, the proper position of the tag_floor"
on the Z axis. Select the tag_floor" and open
the "Object Info" dialogue by right clicking
the "Object Tool"
Change the Z Location to 1.27 so that the tag_floor"
moves up to knees of the character like in the image
on the right.
|
|
|
| Launching the Game Character Plugin |
| 
|
It's very, very important that you save your scene
at this point. It doesn't matter what you save it
as or where you save it to.
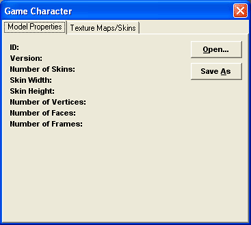
Select your Biped from the scene. Then click the
"Game Character" icon. The Game Character
dialogue box should appear as in the image on the
left.
|
|
| Choosing Your Save Location |
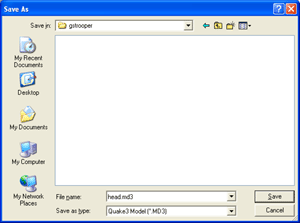
| From the Game Character dialogue
box click the "Save As" button. Navigate
to the directories you created earlier - gstrooper\models\players\gstrooper.
Enter the File Name "head.md3" and change
the Save as type to "Quake3 Model(*.MD3)"
Click the "Save" button and you should see
a MD3 Export dialogue box appear. |
|
|
| Exporting the head.md3 |
| 
|
The MD3 Export dialogue is comprised of three
main sections - Objects, Tags and Animation. The
Tags section is split into two non-distinct parts
- Tags for Export and Origin Tags.
Objects - Select the h_head from the objects list
and click the "Export" button. h_head
should now appear in the Objects for Export list.
Tags - Select the tag_head from the tags list and
click the "Export" button. The tag_head
should now appear in the Tags for Export list.
Origin Tag - Select the tag_head from the tags list
and click the "Origin" button. The tag_head
should now appear in the Origin Tag window.
Animation - Check the "Export Animation"
box and enter 0 in the frame list window.
Click the "OK" button and wait a moment
for the export to finish.
|
|
| Editing the head_default.skin
File |
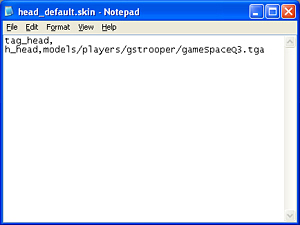
| Open your gstrooper\models\players\gstrooper
folder and open the head_default.skin file with your
favorite document editing program. Notepad or Wordpad
work fine.
Modify the text so that it reads like this:
tag_head,
h_head, models/players/gstrooper/gameSpaceQ3.tga
Save the head_default.skin file changes. |
|
|
| Exporting the upper.md3 |
| 
|
Make sure that the Biped is still selected and
that the Game Character window is still open. Click
the "Save As" button and locate your gstrooper
directory again. Enter the File name "upper.md3"
and choose the Save as type "Quake3 Model (*.MD3)"
then click Save.
In the MD3 Export dialogue enter the following information:
Objects - Select the u_backpack, u_flames and u_torso
from the objects list and click the "Export"
button. u_backpack, u_flames and u_torso should
now appear in the Objects for Export list.
Tags - Select the tag_head, tag_torso and tag_weapon
from the tags list and click the "Export"
button. The tag_head, tag_torso and tag_weapon should
now appear in the Tags for Export list.
Origin Tag - Select the tag_torso from the tags
list and click the "Origin" button. The
tag_torso should now appear in the Origin Tag window.
Animation - Check the "Export Animation"
box and enter 0-152 in the frame list window.
Click the "OK" button and wait a moment
for the export to finish.
|
|
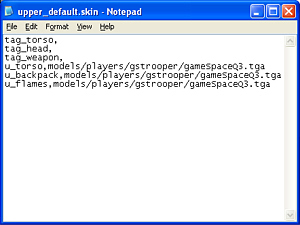
| Editing the upper_default.skin
File |
| Open your gstrooper\models\players\gstrooper
folder and open the upper_default.skin file with your
favorite document editing program. Notepad or Wordpad
work fine.
Modify the text so that it reads like this:
tag_torso,
tag_head,
tag_weapon,
u_torso, models/players/gstrooper/gameSpaceQ3.tga
u_backpack, models/players/gstrooper/gameSpaceQ3.tga
u_flames, models/players/gstrooper/gameSpaceQ3.tga
Save the upper_default.skin file changes. |
|
|
| Exporting the lower.md3 |
| 
|
Select the Biped and click the "Glue as child"
icon. Your cursor should change to a glue bottle.
Click the cursor on the tag_floor" and deselect
the "Glue as child" mode.
Make sure the Game Character dialogue is still open
and click the "Save As" button and locate
your gstrooper directory again. Enter the File name
lower.md3 and choose the Save as type Quake3 Model
(*.MD3). Click Save.
In the MD3 Export dialogue enter the following information:
Objects - Select the l_legs from the objects list
and click the "Export" button. l_legs
should now appear in the Objects for Export list.
Tags - Select the tag_torso from the tags list and
click the "Export" button. The tag_torso
should now appear in the Tags for Export list.
Origin Tag - Select the tag_floor" from the
tags list and click the "Origin" button.
The tag_floor" should now appear in the Origin
Tag window.
Animation - Check the "Export Animation"
box and enter 0-89, 153-254 in the frame list window.
Click the "OK" button and wait a moment
for the export to finish.
|
|
| Editing the lower_default.skin
File |
| Open your gstrooper\models\players\gstrooper
folder and open the upper_default.skin file with your
favorite document editing program. Notepad or Wordpad
work fine.
Modify the text so that it reads like this:
tag_torso,
l_legs, models/players/gstrooper/gameSpaceQ3.tga
Save the upper_default.skin file changes. |
|
|
| Creating the icon_default.tga |
| 
|
Back in gameSpace we need to create the icon that
will show up in the Quake III Arena model selection
menu.
Hide all your tags and select a pose of the character
from the waist up. Choose render to file and create
a tga image 128 x 128 pixels at 32-bit. Enter icon_default.tga
as the name.
|
|
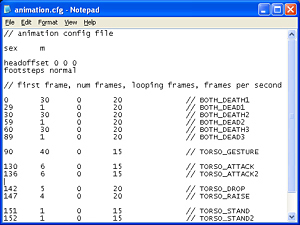
| Describing the animation.cfg File |
| The animation.cfg file is comprised
of several important parts.
sex = the gender of the character
headoffset = the x,y,z location of the head.md3 in
the game's hud
footsteps = the foot step sounds used by the character
framelist = the start, length, loop quantity and speed
of the animation sequences |
|
|
| Creating the animation.cfg File |
sex m
headoffset 0 0 0
footsteps normal
// first frame, num frames, looping
frames, frames per second
0 30 0 20 // BOTH_DEATH1
29 1 0 20 // BOTH_DEAD1
30 30 0 20 // BOTH_DEATH2
59 1 0 20 // BOTH_DEAD2
60 30 0 20 // BOTH_DEATH3
89 1 0 20 // BOTH_DEAD3
90 40 0 15 // TORSO_GESTURE
130 6 0 15 // TORSO_ATTACK
136 6 0 15 // TORSO_ATTACK2
|
142 5 0 20 // TORSO_DROP
147 4 0 20 // TORSO_RAISE
151 1 0 5 // TORSO_STAND
152 1 0 5 // TORSO_STAND2
153 8 8 15 // LEGS_WALKCR
161 12 12 15 // LEGS_WALK
173 11 8 15 // LEGS_RUN
184 10 10 15 // LEGS_BACK
194 10 10 15 // LEGS_SWIM
204 10 0 15 // LEGS_JUMP
214 6 0 15 // LEGS_LAND
220 8 0 15 // LEGS_JUMPB
228 1 0 15 // LEGS_LANDB
229 10 10 5 // LEGS_IDLE
239 8 8 5 // LEGS_IDLECR
247 7 7 15 // LEGS_TURN |
|
| Creating the gstrooper.pk3 File |
| 
|
Create zip file of the models folder and all of
it's sub-folders. Name the file gstrooper.pk3 and
place it in your Quake III Arena\baseq3\ directory.
|
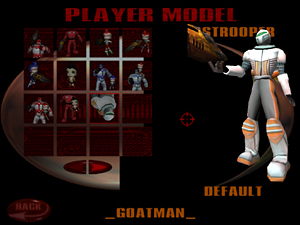
| Load Quake III Arena and view your
model in the player selection menu. |
|
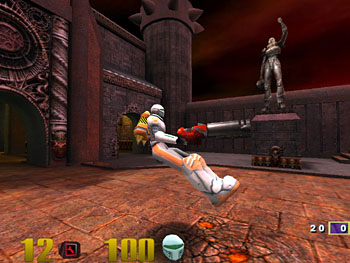
Ingame Bot of imported model |
|
若是您希望進一步瞭解 gameSpace 的功能,請 E-Mail:
dgsupport@digivision.com.tw
總代理:仕冶資訊股份有限公司 DigiVision Corporation
http://www.digivision.com.tw
|
|