| by Rick J. Kelley |
| This tutorial will show you to get your model into Unreal
Tournament as fast as possible from gameSpace. |
|
| What is needed to complete your
model |
You will need to get UnrealED installed on your system,
as well as the latest Unreal Tournament Patches from the Unreal
web site known as utpatch4361.exe, as well as the
Bonus Pack 4 known as UTBonusPack4.umod. These are necessary
to compile a skeletal character for Unreal Tournament. At
the time of this writing you can find these patches at this
web site: http://www.unrealtournament.com/downloads/.
You will also need make sure you have installed the Milkshape
3D plugin for gameSpace by Mete Ciragan.
|
| Preparing the model |
Before you start, I cannot emphasize enough, to make
a backup of your System Folder that you find in your UT
game directory. If you don’t, you may have to reinstall
the whole game and apply the patches to it.
Another consideration is how you’re going to create
the model and its textures so UT will recognize it. The
mesh needs to be of one group only, and not separate objects.
The textures have to be in a certain order as well. If your
going for team support you will need at least 3 separate
images. One is for default, or for no team color. Two are
needed for Red and Blue teams. One other image needs to
be used for what is called a Chat texture, or what you see
ingame when another player or a bot is speaking. The textures
should start out with a 4 character naming convention that
contains a part of the name, and the name of the package
that you will be creating for import into UT. I chose Engy,
and each image that will be used for his default, and team
colors and the Chat texture all started out with Engy. For
example the default had Engy0.pcx as its name, then the
teams followed with Engy1.pcx - Engy4.pcx, then the chat
texture was named Engy5Face.pcx. Later it was important
to name the packaged UTX texture file EngySkins.utx so the
engine could find it and appoly it to the model, but more
on that later. These “skins” need to be 256
indexed color or the UT engine will not be able to use them
and may crash.
For demonstration purposes, I am using my old model by
that was made for another game and is pretty low poly. Please
don’t laugh at him as he is quite old as models goes,
and pretty darned low poly!
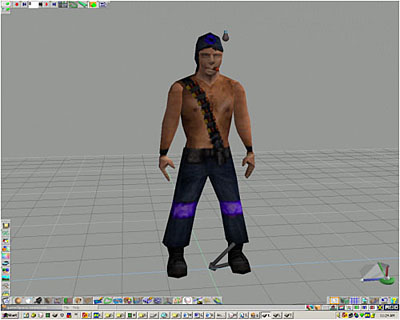
Once you have completed your mesh in gameSpace, you can
export it for use in Milkshape by clicking on the Milkshape
3D button on your toolbar. Then uncheck the Skeleton and
the Animation checkboxes.
|
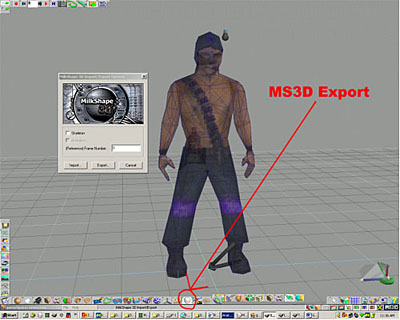
Figure 1.1 Mesh to be exported in Milkshape
|
To prep your mesh for final output, you will need to import
the UT Male skeleton. To do this, you will need to start up
the Milkshape program that is under your gameSpace program
folder. Use the menu commands File->Open and locate your
MS3D file that you just created. Next, use the menu commands
Tools->Unreal Tournament->Load Default Male Skeleton.
You will then need to rig your mesh to it. If you do not know
how to do this yet, I suggest you read up on some tutorials
on how to get your mesh assigned to this skeleton. There is
an excellent help file for milkshape that you can download
here to get started leaning how to rig it: http://www.swissquake.ch/chumbalum-soft/files/MS3DHelp.chm.
From the table of contents, go to the section Animation->Part
2 Assigning Vertices to Bones.
|
| Setting the folders for export
from Milkshape 3D to UT |
Before going on, you need to give some careful thought
as to how you are going to set up your model for UT to recognize
it. If this is not done correctly, you will poor model will
never see the light of day inside of UT!
Since my model idea was an Engineer from the classic game
of TFC and he was based on some fictional writings of the
James Journals on PlanetHalfLife, I am going to call him
Engineer James. This will be shortened to Engy for export
purposes. In this case, this is how I set up my folders
as Figure 1.2 shows.
|
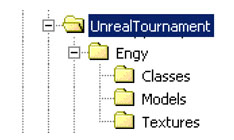
Figure 1.2 Folder setup for the model Engy |
Put all your textures into the Texture folder that is
needed for your model. It is a good idea at this time to
load your default texture from this folder and then to save
the MS3D file to the Models folder.
It’s now time to do your export to UT format. Use
the menu commands File->Export->Unreal Engine Skeletal
Mesh PSK…
You should now have a dialog box ready for you to input
information of your model. I strongly suggest that you keep
your naming conventions simple and use the same names for
all the settings until you get familiar with exporting to
UT. Take a look at my settings for Engineer James in Figure
1.3. |
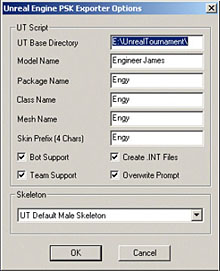
Figure 1.3 Export settings for Engineer James
|
| After clicking OK, you hopefully will see a dialog box pop
up that will say something similar to what is in Figure 1.4. |
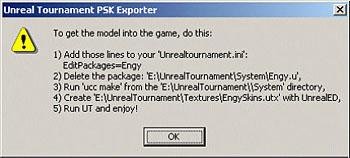
Figure 1.4 Successful Export and comments on completing Model
|
Now that you have exported your player model into the
Unreal Tournament folder of your models work area, you have
some suggestion as Figure 1.4 shows. Follow the steps that
are shown in the list of the dialog box. There is one thing
that really needs to be added to step number 1, as if you
have never compiled for UT skeletal animations, your UCC
compile will fail and you will be tearing your hair out
like me trying to figure out what is wrong! Add this line
above the line where in this case I should put EditPackages=Engy:
Editpackages=SkeletalChars. Type this in exactly as its
worded here in your Unrealtournament.ini file.
If you do not find a .u file that is name in the dialog
box that you need to delete, or in this case it says to
delete the Engy.u file, don’t worry about it because
if this is the first time you have exported to UT, and haven’t
yet compiled it, it wont be found.
You are now ready to compile your file for UT. You will
need to get some kind of command line shell going to do
this. If your using and older version of windows, you probably
can find the MS Dos prompt in the Accessories group off
your Start button. If your using a Windows NT compatible
OS, you can use the Command Prompt shell in your Accessories
group off the Start button. Type the letter of your Drive
that your UT game has been installed in, and then type CD
<your folder structure to your System folder in UT>.
In my case it was E:\UnrealTounament\System.
Now type in “ucc make” in the command line
shell. If your successful, you will see a window similar
to what is shown in Figure 1.5. |

Figure 1.5 Successful compilation window
|
| Creating your UTX texture file
for use in UT |
You may wonder why you need to create a UTX file since
your model had the textures already mapped. UT needs to
have it in a format that it knows about. To get this file
created, you will need to start UnrealED and use its Texture
Browser.
You will need to start UnrealED, the editor for Unreal
Tournament. If you do not have it on your system, you can
find it on the 2nd CD that came with your Unreal Tournament
game. I am using the UnrealED version 2.0 for this tutorial
and this will be added to your Unreal Tournament game if
you have updated with the latest patches and the bonus packs
that you can download from the unreal sites around the web.
Find your Texture Browser in the UED, (short for UnrealED),
Figure 1.6 show what the button looks like in version 2.0. |
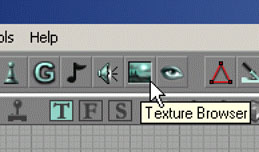
Figure 1.6 Texture Browser button UnrealED |
| Load your textures, from the Texture folder that you set
up and put all your textures into for you model by using the
menu command File->Import on the Texture Browser. You can
select them all. You will see a dialog box that will ask you
were you want to put them. In the case of my model I typed
in EngySkins for the Package setting, as this is what the
UC file was telling the UT engine where these images would
be found for my model. You need to delete anything that may
be in the Group textbox. Uncheck the Masked checkbox. Check
the Generate MipMaps box for every skin that will be applied
to your model except the one for the Chat texture. The Chat
texture will not work if you apply MipMaps to it. (See Figure
1.7 and 1.8 for how this model was set up). |
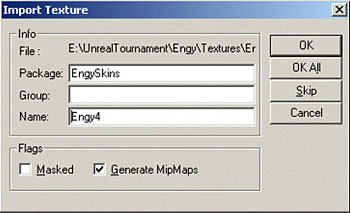
Figure 1.7 Image import for UTX file.

Figure 1.8 UTX file Package
|
Now you need to set up the texture package for proper
use for the UT game engine. In the UED, there is a Quality
settings that needs to be changed.
To set the textures, you need to right click on each texture
in the Texture browser, then choose Properties. Click on
the Quality setting, and drop down the list on each texture,
except the Chat texture, (or the one you see up in the corner
when a bot or player is saying something ingame), and set
the LODSet setting to LODSET_Skin. The Chat texture needs
to have the LODSet setting set to LODSET_World if its not
already that way. |
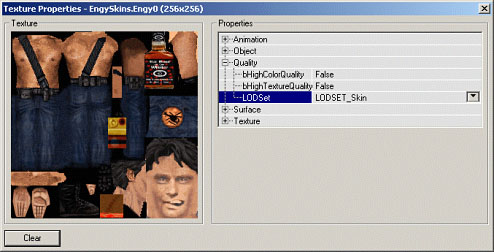
Figure 1.10 UTX Quality settings UnrealED |
Now all you have left to do is to save this UTX file.
Use the menu commands File->Save. When the SaveAs dialog
box comes up, navigate to your UT Texture folder, (not the
Texture folder that you created for the model to export/import
to UT). This should be under the main UT directory.
There is one thing that seems to be needing fixing from
the Milkshape 3D export, the file called whatever you named
your model with the Skins.int added to it. In my case it
was called EngySkins.int, and it was found under the System
directory from the UT folder. Open up your Skins.int file
in notepad and edit all the lines that could be messed up
because it was expecting images to represent groups of images
to be applied to body sections. I didn’t do it this
way and assigned only one texture to the whole mesh. I accomplished
this by deleting anything below the lines that contained:
“Object=(Name=EngySkins.Engy0,Class=Texture,Description=.”
After this I put in the name of the team so my lines now
looked like this:
[public]
Object=(Name=EngySkins.Engy0,Class=Texture,Description="Default")
Object=(Name=EngySkins.Engy1,Class=Texture,Description="Red
Team")
Object=(Name=EngySkins.Engy2,Class=Texture,Description="Blue
Team")
Object=(Name=EngySkins.Engy3,Class=Texture,Description="Green
Team")
Object=(Name=EngySkins.Engy4,Class=Texture,Description="Gold
Team")
Object=(Name=EngySkins.Engy5Face,Class=Texture,Description="Face")
That’s it! You’re done! You should have what
I have in the Unreal Tournament screens as below. Now fire
up Unreal Tournament and start having some fun. I know I
will be! |
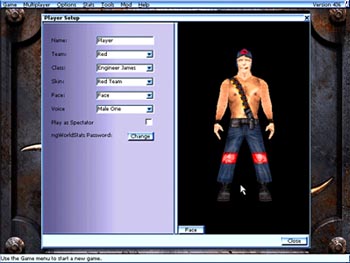
Player Selection of Player model import
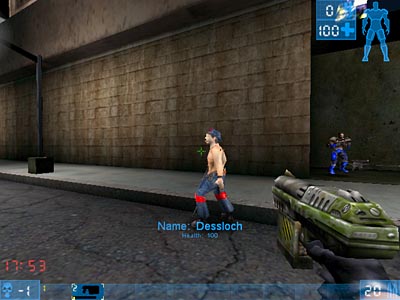
Ingame Bot of imported model
|
| |
|
若是您希望進一步瞭解 gameSpace 的功能,請 E-Mail:
dgsupport@digivision.com.tw
總代理:仕冶資訊股份有限公司 DigiVision Corporation
http://www.digivision.com.tw |